.bmp)
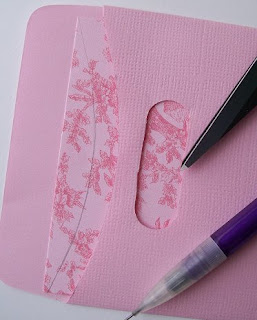
Step 2: Now you'll want to punch your circles on the end of each line. I made sure to let my pencil line dissect the circle exactly in half before squeezing. I then drew straight lines with my ruler and pencil connecting the tops of each circle and the bottoms of each circle. Using your craft knife or scissors you should then cut along these lines to create your oval opening. (I would glue my decorative paper on before I did all these steps, so that I would only have to punch and trim all in one step, but it turned out to be easier for the tutorial to show you a simplified version.)
Step 3: Now that you have your oval slot for your ribbon to slide through your card's housing base is complete. For my project though I wanted a matted piece of patterned paper. Normally you would just trim your patterned paper 1/4" or so smaller, but since I had a curved edge at the top of my library pocket that wouldn't do for me. I trimmed the width of my PP to 1/4" smaller than the base then slid it into the pocket. I then traced with a pencil the curve of the pocket and cut it by hand. Now you can measure your PP to a quarter inch smaller in length and have it matted nicely. You'll also want to create your card to fit in your pocket and a piece of matching ribbon at this point.  Step 4: You'll want to slide your card into the base with the ribbon loosely sandwiched around it so that both ends of the ribbon are hanging out of the open end of the base. You'll then pull the top end of your ribbon through the slot you've already created and tie a knot or bow.
Step 5: I recommend adhering your ribbon to the back of your card insert so that it's not wobbly when you slide it in and out of the base. Your card should work like this now:

I also turned the card insert into a gift card holder. Once I get a real gift card I'm sure anyone will love this card. And...that's it!


16 comments:
thanks for sharing a great tutorial, great card.
AWESOME TUTE!!!!....you rock...(of course I am a tad prejudice, BFF)...BUT YOU DO!.....we have to get together & have a FUZZY bear making day....hmmmmmmm...we should wear FUZZY slippers while we do it!!!...
That is totally adorable Laura - I love the colors, and the tutorial is great - TFS!!! *STAMPIN HUGS* Alex
Great tutorial! I really like how you showed the detail of the oval slot. WHere did you get the fuzzy bear? it is really cute. Glad to see ya back girl!!!
Pets to Lilly
jayne
I don't have the word window punch... or a small circle punch... but I do have an oval punch! (maybe that'll work :P)
I'm denifetely trying this if I can squeeze some time over the week. Thank you!!
Oh Wow!! what a Cute and Fabulous gift care holder.....and a great tutorial!!
did you know there is a lady that make scrapbook pages with fuzzy bears like that and they sell for $$$ on ebay? You need to get busy. Hee hee! Here is a link to her last auction. Ok these are bunnies, but you get the idea.
http://cgi.ebay.com/ws/eBayISAPI.dll?ViewItem&category=11792&item=280210282956
Sooooo cute Laura!
Many Blessings,
M.
Thanks for the tutorial. I received one of those cards and am still trying to figure it out. I just love your cards, they're awesome! There might even be a few I may have to case.
I would love to see a tutorial on those awesome and adorable bears. I love this tutorial, too. I am definitely going to try this soon. Thanks for sharing.
This is so lovely. the teddybear is so cute
thank you fot this tutorial!
hugs
kyky
Wow! Thanks for the awesome idea!
So, so very pretty! I love that adorable teddy bear.
CC
Hi Laura,
Glad to see you back also and just wondered where you'd been???
Missed you,,,,,
Mary
Thanks for showing how easy it is to do things like this Laura and good to have you back.
Have missed you .
If you wear fuzzy slippers here while making the bear yo will roast to death as it has been 90 here today.
Hugs,
mary
Post a Comment