Showing posts with label Tutorial. Show all posts

Monday, July 4, 2011

Happy 4th of July

Don't you just love the 4th of July? Picnics, sparklers, watermelon, patriotic bunting & flags. I love it all. If you think your town really knows how to rock out a patriotic holiday, you should try living near a military post! My husband & I have collectively served more than a couple decades & feel that we're perhaps just a tiny bit of a couple of experts in the celebratory matter. My husband is the master chef grill-man extraordinaire while I am the planning decorating shin-dig startin' guru. Pass me the microphone, & I'll get it kickin' in no time! This year will be a bit quieter since my sweet hubs is deployed, but I just had to do a little decorating anyway. I was inspired by wood shavings for this project. Yes, those left over things from when you sharpen your pencil. Anyway, my pencil didn't make big enough shavings, and since my sweet carpenter hubs wasn't here to help me out, I decided to create my own. Let's get started...

Step 1: Pick out your patterned papers.

Step 2: Wrap ribbon around a foam wreath so that your pins will have something to anchor to & to create color blocking guidelines.

Mine looked like this when I was done:

Step 3: Punch out circles, scalloped circles, or even both from your patterned papers. Cut them in half, & roll them into "shavings".

I folded the tips of mine flat to give me a place to put the pins.

Step 4: Start sticking them to your wreath.

Keep going...

It took a while, but I ended up with this:

It looked a little plain, so I went on to
Step 5: Apply white paint or ink to some Chip Art stars, punch holes in them, & adhere them to your wreath.

Finally, here's what I ended up with:

Patterned Papers I used:


Monday, April 14, 2008

Ribbon Slider

You asked for it! This is my first attempt at a tutorial of one of my cards. I'm sure that I'm not the original creator of this interactive card, so I'm not taking credit by any means. I hope you like it...
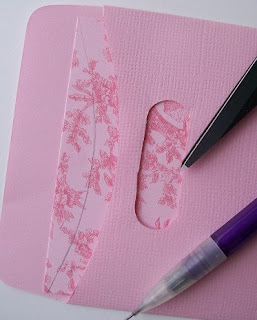
Step 1: The first thing you want to do is create your card housing base. The card from the last post was a sealed envelope that I trimmed one edge from, but today I'm using a library pocket. Since not everyone has an oval shaped Word Window Punch (Stampin' Up!) like I used on my original card I decided to show you how to make an oval slot with a circle punch. You can do this with any size. I first drew a line matching the width of my desired slot as you can see by the pencil line in the picture.

Step 2: Now you'll want to punch your circles on the end of each line. I made sure to let my pencil line dissect the circle exactly in half before squeezing. I then drew straight lines with my ruler and pencil connecting the tops of each circle and the bottoms of each circle. Using your craft knife or scissors you should then cut along these lines to create your oval opening. (I would glue my decorative paper on before I did all these steps, so that I would only have to punch and trim all in one step, but it turned out to be easier for the tutorial to show you a simplified version.)

Step 3: Now that you have your oval slot for your ribbon to slide through your card's housing base is complete. For my project though I wanted a matted piece of patterned paper. Normally you would just trim your patterned paper 1/4" or so smaller, but since I had a curved edge at the top of my library pocket that wouldn't do for me. I trimmed the width of my PP to 1/4" smaller than the base then slid it into the pocket. I then traced with a pencil the curve of the pocket and cut it by hand. Now you can measure your PP to a quarter inch smaller in length and have it matted nicely. You'll also want to create your card to fit in your pocket and a piece of matching ribbon at this point. Step 4: You'll want to slide your card into the base with the ribbon loosely sandwiched around it so that both ends of the ribbon are hanging out of the open end of the base. You'll then pull the top end of your ribbon through the slot you've already created and tie a knot or bow.

Step 5: I recommend adhering your ribbon to the back of your card insert so that it's not wobbly when you slide it in and out of the base. Your card should work like this now:

Step 6: Embellish! I've been into making little paper bears out of mulberry paper for a while now, so I thought I'd put one of my fuzzy little guys on this card along with a few pieces of bling! (Do I need to do a tutorial on mulberry bears too?)

I also turned the card insert into a gift card holder. Once I get a real gift card I'm sure anyone will love this card. And...that's it!

I'd love to see your creations with this technique. I've got some blog candy waiting for all of my creative participants. Happy scrappin'!