

Saturday, April 26, 2008
Lilly's New Do
I finally took Lilly in for a hair cut. I've been debating over it in my head for a while now. I just couldn't bear the thought of cutting all that cute shaggy hair. She just looks SO different now. All the pretty black hair is finally gone. I miss that too. I'm not sure that she likes her new do though. I've been getting the stink-eye from her since I picked her up. She kinda looks like a little old man... Don'tcha think?
Tuesday, April 22, 2008
My First Time
I'm always telling my friend Debbie that it's my goal to at least send in a card to one of the paper crafting publications. I finally did it last week. I jumped right in and submitted to my all-time favorite publication: CARDS! Don't you love their stuff?! I DO! I've been subscribed to their monthly book for over two years now. I can't live without it. I waited on pins and needles to hear back from them. I didn't know what they'd say or even if they would respond to me at all. Last Friday when the clock hit 1600 I gathered my things to go home for the day, but not before hitting the refresh button on my email server. Ooo! A new email... it was from "them"! I was so excited I couldn't really read the entire email. I only got through the first "Congratulations!" before I yelled across the office for the other two girls to come and see. We printed out the six-page email with complete directions on how to get my card to them. I only had until the following Wednesday to get it in their hands. That didn't leave me much time. I carefully measured and wrote directions on how to remake my project, kissed it goodbye, and handed it over to the mail man. Thankfully, this morning I received another email from "them" saying my project arrived safely. Yes! They also made it clear that although they've accepted my project for consideration, it doesn't mean I've made it in the book. Now I just have to WAIT until SEPTEMBER to see if I'm in. Ugh! That's FOREVER away. I don't know if I can stand it!
Monday, April 14, 2008
Ribbon Slider
You asked for it! This is my first attempt at a tutorial of one of my cards. I'm sure that I'm not the original creator of this interactive card, so I'm not taking credit by any means. I hope you like it...
Step 6: Embellish! I've been into making little paper bears out of mulberry paper for a while now, so I thought I'd put one of my fuzzy little guys on this card along with a few pieces of bling! (Do I need to do a tutorial on mulberry bears too?)
Step 1: The first thing you want to do is create your card housing base. The card from the last post was a sealed envelope that I trimmed one edge from, but today I'm using a library pocket. Since not everyone has an oval shaped Word Window Punch (Stampin' Up!) like I used on my original card I decided to show you how to make an oval slot with a circle punch. You can do this with any size. I first drew a line matching the width of my desired slot as you can see by the pencil line in the picture..bmp)
Step 2: Now you'll want to punch your circles on the end of each line. I made sure to let my pencil line dissect the circle exactly in half before squeezing. I then drew straight lines with my ruler and pencil connecting the tops of each circle and the bottoms of each circle. Using your craft knife or scissors you should then cut along these lines to create your oval opening. (I would glue my decorative paper on before I did all these steps, so that I would only have to punch and trim all in one step, but it turned out to be easier for the tutorial to show you a simplified version.)
Step 3: Now that you have your oval slot for your ribbon to slide through your card's housing base is complete. For my project though I wanted a matted piece of patterned paper. Normally you would just trim your patterned paper 1/4" or so smaller, but since I had a curved edge at the top of my library pocket that wouldn't do for me. I trimmed the width of my PP to 1/4" smaller than the base then slid it into the pocket. I then traced with a pencil the curve of the pocket and cut it by hand. Now you can measure your PP to a quarter inch smaller in length and have it matted nicely. You'll also want to create your card to fit in your pocket and a piece of matching ribbon at this point. 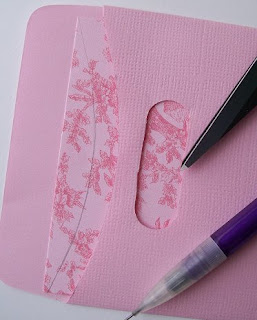 Step 4: You'll want to slide your card into the base with the ribbon loosely sandwiched around it so that both ends of the ribbon are hanging out of the open end of the base. You'll then pull the top end of your ribbon through the slot you've already created and tie a knot or bow.
Step 5: I recommend adhering your ribbon to the back of your card insert so that it's not wobbly when you slide it in and out of the base. Your card should work like this now:
I also turned the card insert into a gift card holder. Once I get a real gift card I'm sure anyone will love this card. And...that's it!

Friday, April 11, 2008
Finally Expired
UPDATE: This project has been removed for publication. Look for it in CARDS - September 2008.
My account finally expired on my last dating site. I haven't really used it in quite sometime, but I can't help but feel relieved now that I don't have to shell out any more money on crap that's not really working for me. I did meet a couple of guys who were nice but had no personality. I meet even more guys who were total weirdos though. Remember THIS POST? I was signed up for three sites there at one point. Yeah, I'm pathetic. At least I was committing, right? All my chips were in there for sure. As I promised yesterday...I made another card with more stuff from my Scarlet Lime kit. This card has a ribbon pull tab that slides the inner card in and out of the envelope. I just love interactive cards. They're so much fun. If anyone wants instructions on the construction of this card just let me know, and I'll whip up a tutorial. Cardstock: Bazzill Basics, Envelope: Bazzill Basics, Patterned Paper: Making Memories, Ribbon: American Crafts, Flower: Making Memories, Brad: Making Memories, Stamp: Close To My Heart & Stampin' Up!, Chipboard/Stickers: Making Memories, Button: Unknown, Special Tools: Circle Cutter & Window Punch (SU!)
Thursday, April 10, 2008
Scarlet Lime
I'm home earlier than usual at least. I've even taken a shower already! It's amazing how the little things really start to make you feel good when you've missed them for a while. I haven't been able to unwind this early in quite some time. I still missed Oprah, but I think I can catch up on the highlights online. I haven't watched that show in so long that I think I really have gone past missing it to not caring anymore. I'm not sure when the last time was that I even picked up the remote. More often than not I'd rather spend time listening to music, playing with Lilly, catching up on house work, or finding any spare creativity I can to make something. The project below is created with my fun new Scarlet Lime kit. The name of the club is yummy all by itself. You can sign up for a three or six month membership. I signed up for the six month stint. You even get an extra special treat if you sign up for six months, (but don't ask me to spill the beans on that one because I don't even know what it is yet!) Christy is the creator of this site, and I must say she is alone the epitome of superb customer service. She's always SO sweet and SUPER quick to respond to any little thing I happen to email her about. I give it two thumbs up! I can't wait to play with the next kit. Anyhow, this is my first creation with the kit. I added a couple of things from my own stash, but I've got WAY more stuff to use from the kit, so I already have another project waiting for you for tomorrow's post. So...what do you think?

Cardstock: Bazzill Basics, Patterned Paper: Making Memories & the Paper Studio, Brad: Making Memories, Flower: Making Memories, Ribbon: American Crafts, Die cut: Cricut, Fabric & Lace: Unknown
Tuesday, April 8, 2008
Altered Composition Book
Today was such a tiring day. I didn't do anything particularly strenuous, but I'm wiped-out completely! I just got home, so that means I spend yet another extra hour at work somehow. I even went in an hour and a half earlier this morning. It's sucking my life away! At least I managed to get a post in. It's short, but it's here...
 Here's what I did: I started with a blank composition book and painted the spine and page edges in thin multiple coats of Meadow paint (Making Memories). I then used a combination of red line tape and a liquid adhesive to attach the embossed glittered polka dot paper (MM). I used my craft knife to trim the edges. I then attached the striped patterned paper (MM) and a couple of scalloped borders I trimmed from another piece of die cut paper (MM). I then attached the chipboard pieces, brad, and flowers (MM) using glue dots. And...that's it!
 Here's what I did: I started with a blank composition book and painted the spine and page edges in thin multiple coats of Meadow paint (Making Memories). I then used a combination of red line tape and a liquid adhesive to attach the embossed glittered polka dot paper (MM). I used my craft knife to trim the edges. I then attached the striped patterned paper (MM) and a couple of scalloped borders I trimmed from another piece of die cut paper (MM). I then attached the chipboard pieces, brad, and flowers (MM) using glue dots. And...that's it!
Monday, April 7, 2008
Altered Organic Soap
 I bought these organic soaps packaged beautifully in egg carton-like boxes when I purchases the wedding favor stuff I posted a couple of weeks ago. I wanted these to accompany the bath salts, but I never got around to it. I'm such a bum sometimes. There's the side of me that works way too hard and the other side of me that could sleep the whole day away. That lazy bum side usually comes out more frequently after a long day of being G.I. Jane. More and more I think of how much I wish I could live back home though. I love being a Soldier, but life here isn't really moving forward the way I always thought it would be. I've felt like a transient for the past three or four years that I've lived here. I just don't have a sense of permanency that I really long for. I want to settle into something. I want something stable in my life. I just don't know what that something is. You'd think my job would fulfill this need. I mean, I do have the most stable job I can think of. I don't foresee getting laid off anytime soon. I'm not even in a deployable unit right now, and I'm even guaranteed to stay for another two years. That's stability, right? Then why don't I feel like it. Am I being selfish? Maybe I'm just done with this chapter of my life. I've accomplished all of the goals I set out to achieve. I just don't know what's next...
 Here's what I did: I cut a strip of (double sided) patterned paper to 2-3/4" wide and a solid piece to 3/4" wide. I stamped the solid piece with a background stamp from Stampin' Up! in Really Rust also from SU!. I then wrapped the strips of paper around the box before adhering the strips to themselves, so I can still slide the band off without damaging the wrapping. I used the Making Memories Tag Maker to create the center embellishment, but stamped it with a set from PTI in Sahara Sand (SU!) first. I used my Crop-o-dile to punch a couple of holes in the tag so I could run the ribbon (SU!) through before tying it in a bow. And...that's it!
Sunday, April 6, 2008
Vaccinate Your Children
I always let Lilly out back in the mornings for a few minutes before I let her run around in the house again. Normally she's sitting there by the door waiting for me, but today she must have gotten into some little adventure because this is what I saw:

Saturday, April 5, 2008
Yet Another Tweak
I don't know why I'm obsessed with "correcting" this card, but I just am. I made this one right after I posted the last one, but it's been sitting on my studio table. I've walked passed it a few times thinking of how to change it yet again. I finally decided to just move on. I'm sure I'll wake up in the middle of the night with a brilliant idea in a couple of weeks or maybe a couple of years. I tend to not let things like that go. The perfectionist in me annoys me quite often. Having something that's not put together the way I like it annoys me too though. It's a lose-lose situation I suppose. I cranked out two other projects today somehow as well, so I'll post those in the next couple of days to come. It'll be nice to have four consecutive posts for once. I started off blogging so well, but I wax and wane. I see you other bloggers are the same, so it lessens my guilty feeling. Ha!  Here's what I did: I started with an A2 base in black then added a 2.5" x 4" piece of patterned paper from KI Memories "Jacks" to the bottom half. The green is the other side of the pp and was ran through my Cuttlebug. It's cut to 3"x4". I then used my craft knife to cut a slit for the ribbon to slide through on the fold. I tied pink stitched ribbon (from Michael's) in a bow. The black circles are from a Quickutz die and adhered with tape runner. And...that's it!
Subscribe to:
Posts (Atom)